Pruning
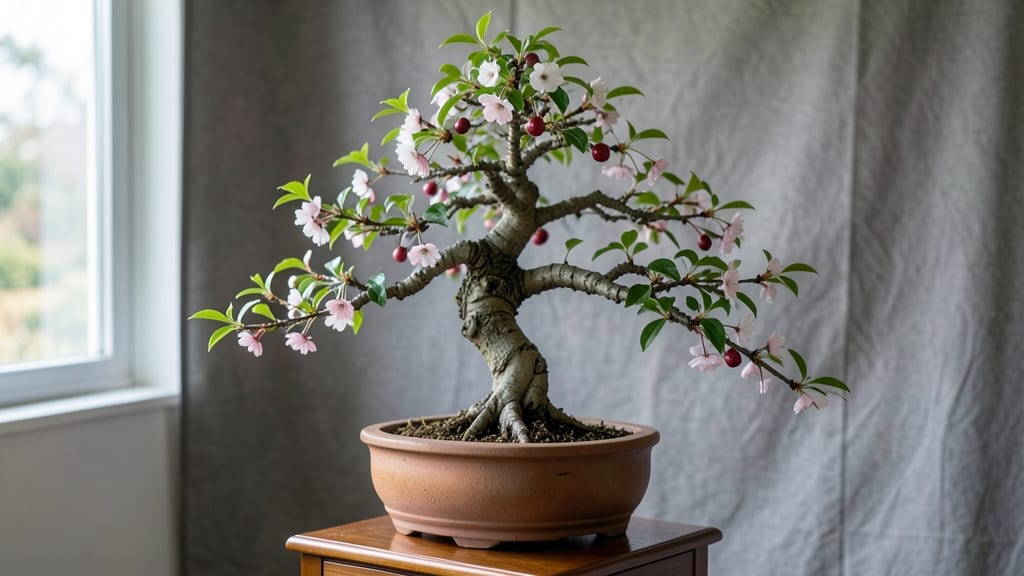
Growing a cherry bonsai fruit tree means tiny branches heavy with real, bite-sized cherries—something that looks like magic until you learn the secrets. 🌸 I started with a dwarfing rootstock and a stubborn little sapling, and now my kitchen table hosts a tree that produces enough fruit to make jam for a dozen jars.
The key isn’t just pruning; it’s balancing art and function so the tree stays small but still bursts with color and flavor every spring.
You’ll need the right variety—dwarfing rootstocks like ‘St. Peters’ or ‘Mazzard’ rootstocks keep the tree manageable, while grafted varieties ensure fruit quality. Pruning isn’t just about shaping; it’s about encouraging fruiting branches by thinning out crowded growth and wiring young branches into place.
The soil mix matters too—well-draining, slightly acidic, and rich in organic matter keeps roots happy without smothering the delicate structure.
By summer, you’ll see the payoff: clusters of tiny cherries forming where you’ve carefully pruned and fed the tree. The trick is patience—bonsai fruit trees take 3-5 years to bear consistently, but once they do, the harvest is shockingly lush.
You’ll learn to defoliate in late summer to spur new growth, and how to handle pests before they swarm your miniature orchard.
This works for both indoor growers (with a bright south window) and outdoor enthusiasts (protected from harsh winds). The same techniques apply whether you’re shaping a trunk or coaxing fruit from a branch. Let’s get your bonsai cherry tree thriving—and fruiting—year after year.
📚 In This Guide
- What you need
- Instructions
- Tips and common mistakes
- Wrapping up and next steps
What you need
- ● Cherry bonsai tree: Dwarf varieties like Prunus serrulata 'Kiku-shidare-zakura' or Prunus avium 'Stella Compact' (ensure it’s grafted for fruit production).
- ● Well-draining bonsai soil mix: 60% inorganic (pumice, perlite, or lava rock) + 40% organic (akadama, peat moss, or fine pine bark). Approx. 2–3 gallons for a 6–8" pot.
- ● Bonsai pot: 6–10" in diameter with drainage holes (unglazed ceramic or plastic). Size depends on tree age—smaller pots encourage root restriction.
- ● Pruning tools: Concave-cutting bonsai shears (for branch pruning)
- ● Needle-nose pruners (for fine branches)
- ● Sharp grafting knife (for root/leaf pruning)
- ● Root hook: For gently teasing roots during repotting.
- ● Wire (aluminum or copper): 1–2mm thickness for branch positioning.
- ● Slow-release fertilizer: Balanced (e.g., 10-10-10 or organic bonsai fertilizer). Apply every 2–3 months during growing season.
- ● Watering can with fine rose: For gentle, even hydration.
- ● Misting spray bottle: To maintain humidity (especially in dry climates).
- ● Root stimulator: Mycorrhizal fungi or seaweed extract to boost root health.
- ● Jiffy-7 pellets: For propagating cuttings if you want to expand your collection.
- ● Bonsai wire cutters: To safely remove wire without damaging bark.
- ● Heating mat: For indoor overwintering in cold climates.
- ● Grafting tools: If you plan to graft fruit-bearing scions onto your bonsai.
- ● Decorative elements: Miniature rocks, moss, or figurines to enhance your display.
Step-by-step techniques for cultivating a cherry bonsai fruit tree
Here’s how I’ve grown miniature cherry trees that produce real fruit—no fancy tools, just patience and precision.
🌱 Step 1: Select and Prepare the Dwarf Rootstock
Choose a dwarfing rootstock like ‘Shari No. 2’ or ‘Fukuba’—these stay under 6 feet tall even without pruning. I always source my rootstock from a reputable nursery to avoid disease. Soak the bare-root plant’s roots in lukewarm water for 2-3 hours before planting to rehydrate them. This step is critical: dry roots struggle to establish.
Fill a 6-inch pot with well-draining bonsai mix (I blend 50% akadama, 30% pumice, and 20% organic compost). The mix must drain fast—bonsai roots rot in soggy soil. Tap the pot gently to settle the soil, then create a small mound in the center. Place the rootstock on top, spreading roots outward naturally. Cover with mix, leaving the graft union (the bump near the base) ½ inch above soil level. Press lightly to eliminate air pockets.
☀️ Step 2: Position for Light and Temperature Control
Bonsai cherries need full sun (6+ hours daily) but protection from harsh afternoon sun in hot climates. I place mine on an east-facing windowsill in summer, moving them outside to a 50% shade cloth when temperatures exceed 85°F. Young trees wilt fast in direct midday heat—watch for leaves curling as your warning sign.
Keep indoor temperatures between 60-75°F during the day and 50-60°F at night. If your home runs warmer, use a small fan on low speed to improve air circulation. Poor airflow invites fungal diseases like powdery mildew, which turns leaves white and stunts growth. Mist the foliage lightly in dry conditions, but avoid soaking the leaves—wetness encourages pests.
💧 Step 3: Water and Fertilize for Miniature Growth
Water when the top ½ inch of soil feels dry—stick your finger in to check. I use the "soak-and-drain" method: water thoroughly until it runs out the drainage hole, then wait until excess drains away before repeating. Overwatering is the #1 killer of bonsai trees. In summer, I water every 2-3 days; in winter, once a week or less. Adjust based on humidity—dry air means more frequent watering.
Feed with a balanced liquid fertilizer (10-10-10) diluted to half-strength every 2 weeks during spring and summer. Switch to a low-nitrogen, high-phosphorus (5-10-10) in early spring to encourage flowering. Stop fertilizing in fall and winter—resting periods are when your tree sets buds for next year’s fruit. I always flush the soil with plain water after fertilizing to prevent salt buildup, which burns roots.
✂️ Step 4: Prune and Shape for Fruit Production
Prune twice a year: lightly in spring to shape and heavily in late winter to remove deadwood. I use sharp, clean bonsai shears to make cuts at a 45-degree angle just above a leaf node. Never remove more than ⅓ of the foliage in one session—your tree needs leaves for photosynthesis to fuel fruit development. After pruning, spray the cuts with horticultural sealant to prevent disease entry.
To encourage fruiting, thin out crowded branches—cherry bonsai produce more fruit on open, well-spaced growth. I leave 3-5 main branches as the framework, pinching back new growth to 2-3 leaves after it emerges. This keeps the tree compact while directing energy into fruit production. Watch for flower buds in early spring—they look like tiny green cones. Protect these buds from frost, as they’re delicate.
🍒 Step 5: Harvest and Overwinter for Next Year’s Fruit
Cherry bonsai fruit ripens 6-8 weeks after flowering. Harvest when the fruit is fully colored but still firm—overripe cherries fall off and rot. I pick them with sterilized scissors to avoid damaging branches. Store harvested fruit in the fridge for up to 1 week, but eat them fresh—they’re sweeter straight off the tree. After harvest, remove any remaining fruit that didn’t ripen to redirect the tree’s energy into next year’s buds.
In late fall, move your bonsai to a cool, dark place (40-50°F) for 6-8 weeks to simulate winter dormancy. Reduce watering to once every 2 weeks, keeping soil just moist. This resting period is non-negotiable—skipping it weakens the tree and reduces flowering. Before bringing it back indoors in early spring, inspect for pests like spider mites or scale and treat with neem oil if needed. Resume regular care as buds begin to swell.
Tips & tricks for perfect cherry bonsai fruit tree cultivation
Here's what I've learned after years of growing these delicate fruit-bearing trees—details that make all the difference between a struggling bonsai and a thriving miniature orchard.
Rootstock Rehydration: That 2-3 hour soak for bare-root plants isn't just about hydration—it's about waking up dormant cells. I've found using lukewarm water (not cold) speeds up the process without shocking the roots. You'll notice tiny white root hairs beginning to form within 30 minutes, which means the plant is actively reviving. This is your signal to move quickly to planting.
Soil Mix Secrets: The 50-30-20 akadama/pumice/compost blend is non-negotiable, but here's the trick: sterilize your components first by baking them at 200°F for 30 minutes. This eliminates any pathogens that could harm your delicate rootstock. Also, I sift the mix through a fine mesh screen to remove any large particles that could impede drainage—bonsai roots need oxygen as much as water.
Light Management: When temperatures hit that 85°F threshold, don't just move your tree to shade—rotate it every 2-3 days. This prevents one-sided growth where the tree stretches toward the light source. I also recommend placing a small mirror near the shade cloth to reflect light more evenly across the canopy. The goal is to maintain that perfect balance of sun exposure that keeps leaves vibrant without causing stress.
Fertilizer Timing: The switch to low-nitrogen (5-10-10) in early spring is crucial for flowering, but here's what nobody tells you—apply it when you first see those tiny green cones (flower buds) emerging. This gives the tree exactly what it needs at the perfect moment. I also recommend mixing your fertilizer with a bit of seaweed extract (1 tsp per gallon) to boost root development without overloading the system.
Pro Tips for Cherry Bonsai Fruit Tree
- Here's what I've learned after years of growing these delicate fruit-bearing trees—details that make all the difference between a struggling bonsai and a thriving miniature orchard.
- Rootstock Rehydration: That 2-3 hour soak for bare-root plants isn't just about hydration—it's about waking up dormant cells.
- Soil Mix Secrets: The 50-30-20 akadama/pumice/compost blend is non-negotiable, but here's the trick: sterilize your components first by baking them at 200°F for 30 minutes.
Frequently asked questions
Got questions about growing your own cherry bonsai fruit tree?
You’re not alone! Here are some of the most common queries—plus quick, actionable answers to help you cultivate a thriving miniature harvest.
Can a cherry bonsai tree actually produce fruit?
Yes! While smaller than full-sized cherries, dwarf varieties like Prunus avium or Prunus serrulata can yield tiny, edible fruits—often just a few per tree. Fruit size depends on pruning, pollination (hand-pollination may be needed), and species. Patience is key; it can take 3–5 years before your bonsai bears fruit.
How long does it take for a cherry bonsai to bear fruit?
Timing varies, but most dwarf cherry bonsai trees take 3–5 years to mature enough for fruiting. Factors like sunlight, soil quality, and proper pruning techniques accelerate the process. Start with a grafted bonsai (like a Sharo or Yamadori seedling) for faster results—some may fruit in 2 years with ideal care!
Will pruning my bonsai prevent it from fruiting?
Not if done correctly! Prune strategically: Avoid cutting back more than 1/3 of the tree in one session, and prioritize shaping over heavy fruit-bearing branches. Focus on structural pruning early on, then shift to fruit-pruning (removing excess buds) once the tree matures. Balance is everything—your bonsai can still produce fruit while staying miniature!
What’s the best climate for growing a cherry bonsai fruit tree?
Cherry bonsai thrive in USDA Zones 5–8, with cold-hardy varieties (like Prunus serrulata) tolerating temps down to -15°F. They need full sun (6+ hours/day) and protection from harsh winds. In warmer climates, provide afternoon shade to prevent heat stress. Dormancy is crucial—ensure winter chilling (below 40°F) for next year’s fruit production.
Why isn’t my cherry bonsai fruiting, even after years of care?
Several factors could be at play:
- Lack of pollination: Hand-pollinate with a small brush if no bees visit.
- Improper pruning: Over-pruning or cutting flower buds (prune after fruiting).
- Nutrient deficiency: Amend soil with low-nitrogen fertilizer (e.g., 5-10-10) in early spring.
- Age/stress: Young trees or those recovering from transplant shock may delay fruiting.
Check for pests (like aphids) or fungal issues too—healthy leaves = better fruit!
Wrapping up and next steps
Growing a cherry bonsai fruit tree is a rewarding journey that blends artistry with patience—your miniature harvest is just around the corner! 🌿 With the right dwarf variety, proper pruning techniques, and consistent care, you’ll nurture a stunning, fruit-bearing tree that’s as beautiful as it is bountiful.
Start small, stay consistent, and soon you’ll be enjoying tiny, sweet rewards from your living masterpiece.
Ready to take the next step? Experiment with different pruning styles or share your progress with fellow bonsai enthusiasts—your green thumb will thank you!