
Aphids
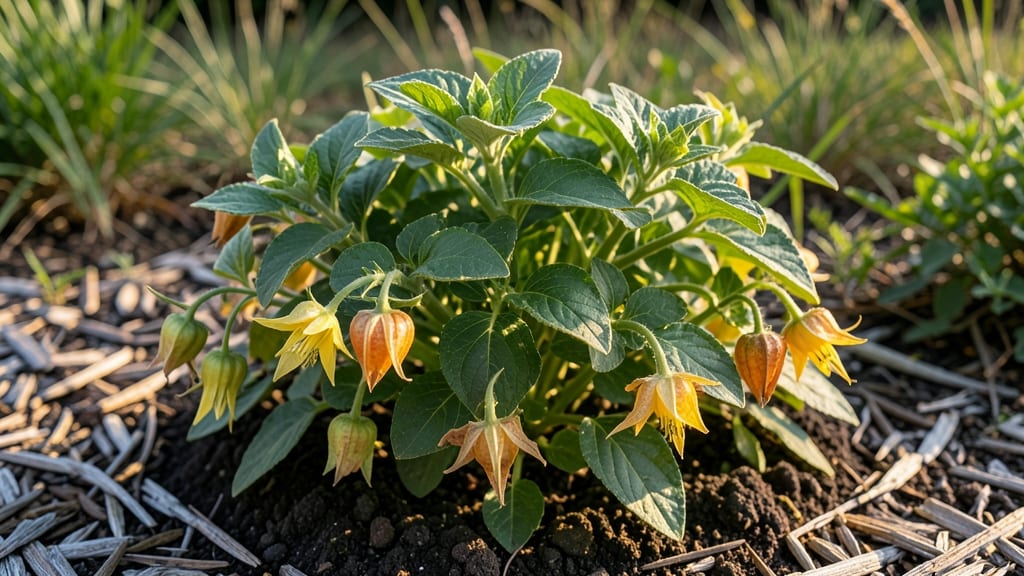
Growing ground cherries transforms your garden into a treasure trove of sun-dried tomato-like fruits with a crisp, tangy twist. 🌱 These "paper lantern fruits" thrive in warm climates, producing clusters of golden-orange berries encased in papery husks—perfect for stuffing with herbs or enjoying fresh.
I learned the hard way that they need consistent warmth and well-draining soil, or you’ll end up with blossom end rot (a common pitfall even experienced gardeners face).
The secret to success lies in full sun exposure and spacing plants 2-3 feet apart—crowding leads to poor air circulation and disease. Start seeds indoors 8-10 weeks before your last frost, then transplant after all danger of frost has passed.
Warm climates (Zones 8-11) can grow them directly in the soil, while cooler regions benefit from a 4-6 week head start indoors.
Once planted, ground cherries are low-maintenance but reward patience with vibrant, prolific harvests by late summer. The fruits ripen unevenly, so check plants every 2-3 days—overripe ones burst open, releasing their sweet-tart pulp. Stuff them with fresh herbs or sun-dry them for a flavor explosion that rivals heirloom tomatoes.
Pest control is minimal if you keep plants healthy: aphids might visit, but a strong spray of water usually does the trick. Store unripe fruits in a cool, dark place to finish ripening, or freeze them for later use.
With the right care, you’ll harvest enough to share—and maybe even forget about store-bought tomatoes forever.
📚 In This Guide
- What you need
- Instructions
- Tips and common mistakes
- Wrapping up and next steps
What you need
- ● Ground cherry plants: 3–5 healthy seedlings or seeds (choose varieties like Physalis pruinosa or Physalis ixocarpa for best results).
- ● Potting soil: 1–2 bags of well-draining, organic potting mix (avoid garden soil—it can compact and suffocate roots!).
- ● Containers or garden bed: For containers: 5–10-inch pots (one per plant) with drainage holes.
- ● For garden beds: Full sun exposure (6+ hours daily) and loose, fertile soil.
- ● Fertilizer: Balanced organic fertilizer (e.g., 10-10-10) or compost tea for a nutrient boost.
- ● Watering can or hose: With a gentle spray nozzle to avoid damaging delicate flowers/fruit.
- ● Gloves: Gardening gloves to protect hands from prickly stems.
- ● Pruning shears: For trimming leggy growth or dead leaves.
- ○ Support stakes: 1–2 bamboo stakes or small cages per plant to prevent sprawling (optional but helpful!).
- ● Pest control: Neem oil: For aphid prevention (common in ground cherries!).
- ● Row covers: Lightweight fabric to shield plants from pests if needed.
- ● Harvesting tools: Small scissors or your hands (gently twist fruit to avoid bruising).
- ● Drying supplies (for stuffed delights): Sun-dried tomatoes (store-bought or homemade).
- ● Fresh herbs (e.g., basil, thyme, or rosemary).
- ● Cheesecloth or parchment paper for drying.
Step-by-step guide to growing and stuffing ground cherries
Here's how to cultivate these golden-orange gems and transform them into a sun-dried tomato and herb-stuffed masterpiece.
🌱 Step 1: Start Seeds Indoors for Early Production
Ground cherries (Physalis pruinosa) thrive when started indoors 8-10 weeks before your last frost date. Use biodegradable peat pots filled with sterile seed-starting mix—this prevents transplant shock later. Plant 2-3 seeds per pot at a depth of ¼ inch, then cover lightly with additional mix. Keep the soil consistently moist but never soggy; a humidity dome helps maintain ideal conditions.
Place pots in a warm spot (70-75°F) with 14-16 hours of grow light daily. Without enough light, seedlings stretch weakly, and you'll end up with leggy, unstable plants. You'll see first true leaves in 7-10 days—this is your cue to remove the humidity dome immediately to prevent damping-off disease.
☀️ Step 2: Transplant Outdoors After Frost and Harden Off
Once seedlings have 4-5 true leaves and nighttime temperatures stay above 50°F, it's time to move them outside. Begin hardening off by placing pots in a sheltered spot for 1-2 hours the first day, gradually increasing exposure over 7-10 days. Watch for wilting or yellowing leaves—this signals they're not ready yet.
Choose a sunny location with 6+ hours of direct sunlight daily. Ground cherries love warmth and produce best in full sun. Space plants 18-24 inches apart in well-draining soil amended with compost. The golden lanterns (fruit) will form 60-70 days after transplanting, so patience is key—don’t rush the process.
🌿 Step 3: Prune and Support for Maximum Yield
As plants grow, pinch back the main stem when it reaches 12 inches to encourage bushier growth. This creates more branches, which means more fruit. Use cage supports or stakes to keep plants upright—ground cherries can get top-heavy with fruit. If left unsupported, branches may break under the weight.
Remove any yellowing or diseased leaves immediately to improve airflow and prevent fungal issues. You’ll notice small papery husks forming around the fruit—these protect the delicate skin from pests. Harvest when the husks turn papery and dry, usually 3-4 weeks after flowering. Gently twist the fruit free to avoid damaging the plant.
🍅 Step 4: Prepare and Stuff Ground Cherries
Preheat your oven to 200°F and line a baking sheet with parchment paper. Cut the sun-dried tomatoes into ¼-inch strips and place them on the sheet. Drizzle with olive oil, sprinkle with salt and black pepper, and bake for 15-20 minutes until slightly softened but still firm. Let cool completely before stuffing.
Mix fresh herbs (like basil, thyme, or oregano) with minced garlic, crumbled feta, and a pinch of red pepper flakes for heat. Stuff each ground cherry through the small opening at the base, packing the mixture tightly. Return to the oven for 5-8 minutes just to warm through—this ensures the flavors meld perfectly.
⏰ Step 5: Serve and Store for Long-Lasting Flavor
Let the stuffed ground cherries cool for 10 minutes before serving. Their tangy-sweet flavor pairs beautifully with grilled meats, salads, or crusty bread. For storage, keep them in an airtight container in the fridge for up to 5 days, or freeze for 3 months—the herbs stay vibrant and aromatic.
If you have extra ground cherries, try dehydrating them whole for a snackable treat. Simply slice the husks off, dry at 135°F for 8-12 hours, and store in a jar. This method preserves their unique sweet-tart profile for months, making them a pantry staple.
Tips & tricks for perfectly cultivated and stuffed ground cherries
Between us, growing and stuffing ground cherries is where patience meets creativity—and these tricks will help you nail both. Here's what nobody tells you about getting the most from your golden lanterns.
Lighting is Everything: That 14-16 hours of grow light isn't just a suggestion—it's non-negotiable for preventing leggy seedlings. I use a combination of LED grow lights and a sunny south-facing window, but if you're short on natural light, supplement with full-spectrum bulbs. The key is maintaining consistent light intensity from the moment you see those first true leaves in 7-10 days. Without it, your plants will stretch toward any available light source, becoming weak and unstable.
Harvest Timing Secret: The 3-4 week window after flowering for harvest might seem broad, but there's a subtle visual cue: the papery husks should be completely dry and slightly crinkled. I harvest in the morning when the fruit is coolest—this prevents premature softening. The golden lanterns will release easily when gently twisted, leaving the husk intact on the plant. If you harvest too early, the flavor won't develop fully; too late, and they'll burst open.
Stuffing Technique: When packing the sun-dried tomato and herb mixture into the ground cherries, use a small spoon to gently press it through the opening at the base. The goal is to create a snug fit without tearing the delicate skin. I find that working with cool (not cold) components prevents the ground cherries from softening prematurely during the final 5-8 minute warm-through in the oven at 200°F. This technique ensures the flavors meld perfectly without losing the fruit's natural structure.
Dehydration Pro Tip: For dehydrating whole ground cherries, I slice off the husks first but leave a tiny stem intact to prevent the fruit from shrinking too much during the 8-12 hour drying process at 135°F. The stem helps maintain shape while the fruit concentrates its sweet-tart flavor. Store these in airtight jars with a sprinkle of salt—it preserves their texture for months while enhancing their natural sweetness.
Pro Tips for Ground Cherry Fruit
- Between us, growing and stuffing ground cherries is where patience meets creativity—and these tricks will help you nail both.
- Lighting is Everything: That 14-16 hours of grow light isn't just a suggestion—it's non-negotiable for preventing leggy seedlings.
- Harvest Timing Secret: The 3-4 week window after flowering for harvest might seem broad, but there's a subtle visual cue: the papery husks should be completely dry and slightly crinkled.
Frequently asked questions
What’s the best time to harvest ground cherries?
Harvest ground cherries when the fruit turns a golden-yellow hue and feels slightly soft to the touch—usually 8–12 weeks after planting. Avoid waiting too long, or the papery husks may split open, exposing the fruit to pests. Pro tip: Pick them in the morning for peak sweetness!
How do I prevent aphids from ruining my ground cherry plants?
Aphids love ground cherries, but you can keep them at bay with neem oil sprays or a blast of water to dislodge them. Planting marigolds nearby deters pests naturally. If infestations persist, try parasitic wasps (like Aphidius colemani)—they’re the ultimate aphid assassins!
Can I grow ground cherries in containers?
Ground cherries thrive in 5-gallon pots or larger with well-draining soil. Just ensure the container has drainage holes and place it in full sun. Bonus: Containers make them easier to move indoors if frost threatens!
What’s the best way to store ground cherries?
Store unwashed ground cherries in a cool, dark place (like a pantry) for up to 2 weeks. For longer storage, freeze them whole or blend into sauces. Fun fact: Their flavor intensifies when dried—like sun-dried tomatoes but sweeter!
Are ground cherries hard to find in stores?
Yes! They’re rare in grocery stores but easy to grow at home. If you can’t find them, try substituting with cherry tomatoes or husk cherries (a close cousin). For a similar texture, golden berries are another great alternative!
Wrapping up and next steps
From their sun-kissed sweetness to their versatile culinary magic, ground cherries are a hidden gem waiting to be explored! 🌟 Whether you're battling aphids with their natural repellent properties or whipping up a gourmet stuffed delight, these tiny fruits pack a punch.
Now that you’re armed with the right materials and answers to common questions, it’s time to get creative—grab those ground cherries and let your kitchen (or garden!) shine.
👉 Next step: Try your hand at stuffing them with herbs and sun-dried tomatoes, or experiment with a new recipe. Share your masterpiece with us—we’d love to see what you whip up! 📸✨